How To Apply Breast Tape, Based On The Style Of Your Shirt

Breast tape, or boob tape as it is more informally known, has been a savior for fashionistas who enjoy experimenting with different styles of clothing. You may wonder how this unobtrusive fashion item became such a staple in our wardrobes. According to author of "The Bra Book" and bra expert Jene Luciani Sena, "The whole movement started when Kim Kardashian used Duct Tape on her breasts. It worked, and then boob tape was born," she told Real Simple.
Professional stylist Chellie Carlson also spoke to Real Simple, sharing what this product aims to do: "Boob tape helps you shape and contour your breasts while holding them in place and is typically used when a proper bra can't be worn because the bra would show underneath the garment. It can also provide nipple coverage and help create cleavage and hold it in the exact position that you want it in underneath the garment."
There is plenty of information available on how to apply breast tape. You can find out how to make sure your boob tape never peeks out of your outfit or how to apply boob tape so that it actually stays put all day. But do you know how to apply it based on the style of your shirt? For instance, a backless shirt will need vertical application while a low-necked shirt works better with horizontal application. We break down these and other steps for you.
How to wear breast tape with backless dresses and tops
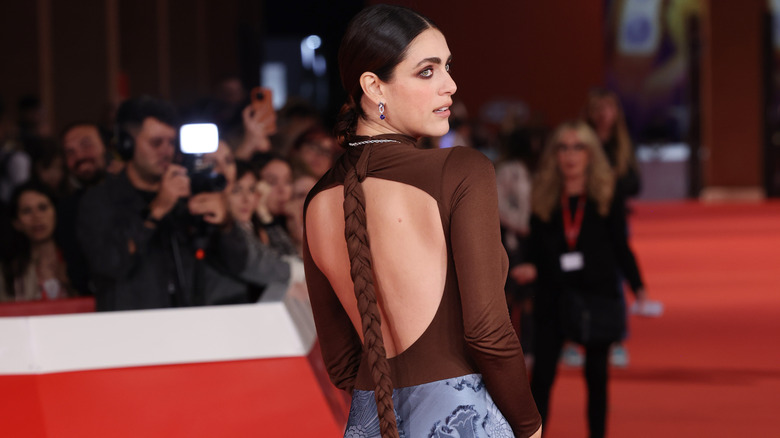
If you are wearing a backless dress or one with a low back that still has a modest front, your concern will be to keep your breasts supported while not showing any of your bra. For this purpose, you need to first apply nipple covers so that the sensitive area around the areolas isn't irritated during the application of the breast tape.
Then cut long strips of the tape to apply vertically along the length of the breast, starting from below the breast and going up toward the collarbone. Be sure to pull tight as you peel off the protective cover of the tape and stick it to the skin so that the breasts are lifted. This step should be repeated as many times as you need.
For example, women with smaller breasts may be fine with a single strip of tape, but those with larger breasts may need two to three strips of tape for optimal coverage and support. If you feel this style of tape isn't enough for support, you could even add a small strip underneath the breasts, running horizontally.
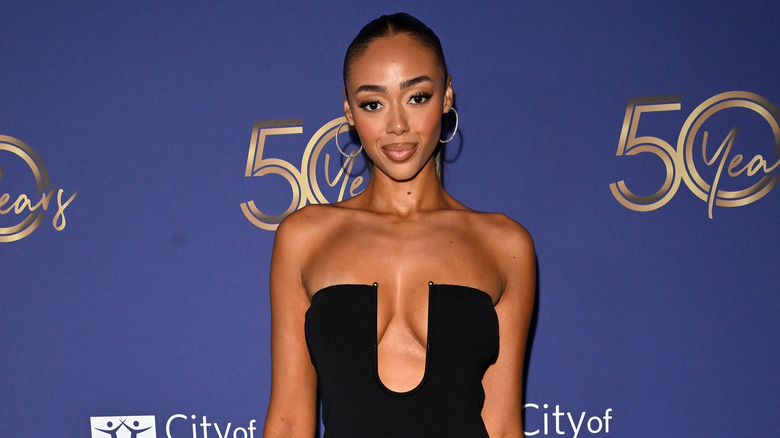
Strapless tops and dresses

Strapless tops or boob tubes cover the breast area but leave the shoulders and décolletage bare for a sexy look. For these kinds of necklines, the concern is support so that the breasts don't spill out of areas they are not supposed to, and no annoying strapless bra lines show from anywhere.
For this style, you can cut long and thick strips of breast tape and horizontally fix them across the width of your breasts. Instead of covering each breast with tape separately, for a strapless neckline, you can tape the breasts together. Be sure to pull the tape taut to keep the area lifted.
Stephanie Montes, the founder and CEO of breast tape brand Nue, describes how she does it to Byrdie: "I like to start underneath and kind of pull upwards. [It's important to] Build from the bottom up for support. Pull upwards for lift and inward for cleavage ... to get a balconette look." Montes loves this technique so much that she also recommends it for wearing under regular T-shirts, saying, "If I want my T-shirt to look really crisp and smooth, then I can add the tape underneath and I don't have to worry about the crease in the back or the line showing up top."
Make it work with low-cut or deep V-necks
For low-cut tops, and especially those that have deep V-necks, your concern may be showing the skin between your breasts while still hiding the nipples and having support where it is needed.
Hence, each breast should be lifted and covered individually for this kind of neckline. Cut strips of breast tape and apply them vertically while pulling upward on each breast. You can end the tape at the top of the breast or close to the collarbone depending on the amount of support you are looking for. You can also run the tape all the way under your straps or sleeves for additional support. One strip or two should also be applied underneath the breast in a horizontal direction for added lift.
For an extra show of cleavage, Montes adds a strip on the outer side of the breasts which pushes them together. She tells Byrdie, "You do need a lot less [breast tape] than you think because the tape does stretch so much."
Applying breast tape with cutout or other oddly shaped tops
Some silhouettes can be hard to define, and even though they provide full coverage, your bra may still end up peeking through when you don't want it to. In such a case, the best thing would be to individually tape your breasts while pulling up. Cut the tape at the top of the breasts instead of carrying it all the way up to the collarbone. Montes describes this particular shape as the "mermaid cup."
In her YouTube video, lifestyle vlogger Holly Jai describes how best to tape your breasts for tops that have a peek-a-boo opening. She tapes each individual breast, and for extra support, adds a bit of tape underneath. This method works especially well for those with larger breasts.
Having figured out the different methods of applying breast tape based on the tops you plan to wear, be mindful of how to remove it as well. It's preferable to use a natural oil like coconut or jojoba instead of water (which can make tape stick more instead of less). Remove the tape slowly and gently so that you don't hurt yourself.