Our Best Tips & Tricks For Mastering A Fishtail Braid

Believe it or not, the fishtail braid is a style dating back over 2,000 years. There's evidence that the ancient Greeks may have worn the style during ceremonial occasions. The design, which is thought to resemble the shape of a fish — hence the name — is depicted among female statues as a record of this (via Fairfield University).
Back then, achieving the hairstyle was even more complicated than it is now. However, that's not to say that hair artists these days haven't created some astonishingly complex versions in recent years. But, for most of us, we're looking for ways to figure out the basics. If you can master it, the result is a stunning look you can wear when you want to level up your usual braid game. The catch is that the fishtail braid is a notoriously tricky hairstyle to achieve by yourself.
So, what's the best way to do a fishtail braid, and are there any tips and tricks to master this look? Many videos show you how to do this look overall, but often, they'll apply it to a hairdresser doll. While this is an excellent way of learning the technique, it's a whole other thing when you try to do it yourself. Luckily, there are some hacks and tips for those of us trying to pull it off on our own hair. They cover everything from the tools we need to the different kinds of fishtail braids we can play with.
Basic steps: Hair prep and what you might need

Learning how to do a fishtail braid can take some time. However, we have some tips and tricks to speed up the process. To achieve the perfect braid, you should have a few hair essentials by your side. You may not need all of them, and you'll likely need less as you improve. But trying out different hacks can help you find the best method for you.
You'll need a brush to detangle your hair before starting and a wide-tooth comb to divide your hair into neat sections. You'll also need hair ties, pins, and clips to hold your hair in place while braiding. A handheld mirror can be helpful to see the back of your head.
Some less obvious things you may need are a pencil, leave-in conditioner, and dry shampoo. The pencil is for a specific method we'll explain below. If you have wavy or curly hair, using a leave-in conditioner can help de-frizz and detangle your hair before braiding. It can also help to keep the style in place after you finish. On the other hand, if you have straight hair and want to add some volume, using dry shampoo can add texture.
Sorting into sections and braiding
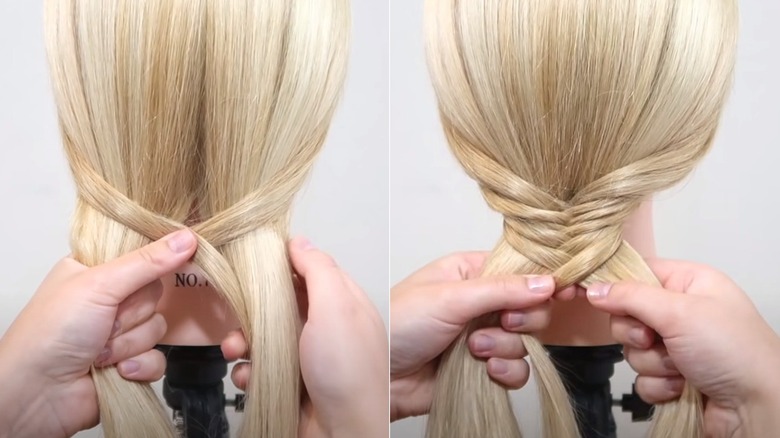
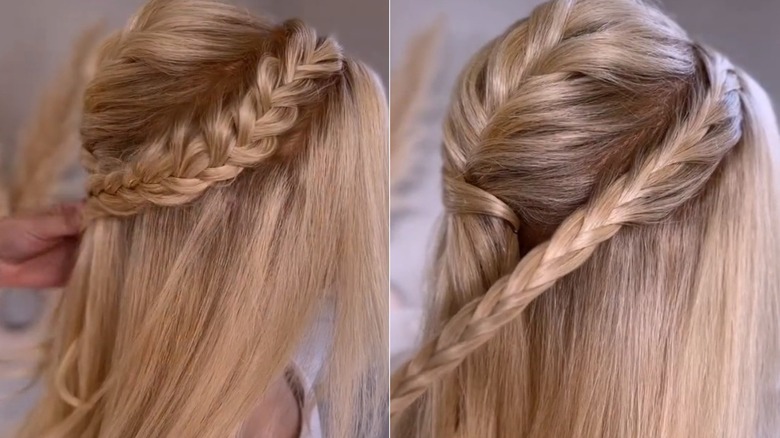
There are three basic steps in the traditional fishtail braid method. The first step is sectioning your hair into two equal parts. You can do this with the wide-tooth comb, starting from your forehead and along the scalp until you reach the nape of your neck. Alternatively, separate a small section a couple of inches from your forehead to keep some hair at the front loose, and start at the beginning of the partition instead. Lay the two sections over either side of your shoulders to separate them.
Take the outermost portion of hair from both the right and left sections. Using your right hand, pull them to the middle and hold the right part with your index finger and thumb and the left with your other free fingers. With your free left hand, add another small section of hair from the left partition to the ones in the right three fingers, crossing them over the original left-side section.
The tricky part is that you'll need to switch the sections of hair you're holding in your right hand to the left hand. Once you've got a firm grip on this hair with your left, your right hand will be free to grab another section from the right. Cross it over the previous left-section of hair, then switch hands. Continue crossing the left and right sections till you reach the end and tie with a band.
Tip: Use bands
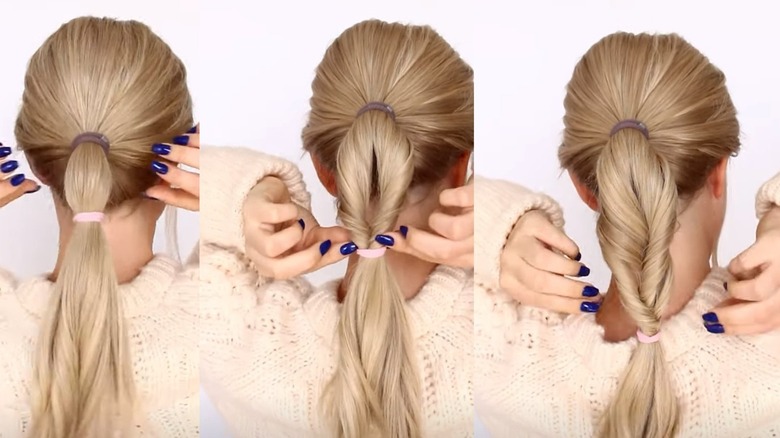
Luckily, if you find braiding too difficult or are in a rush, there's an easy alternative. To try this out, you'll need two hair bands. We'd also suggest you brush out your hair first, as this method can make your hair a little knotty. If you have wavy hair, adding some leave-in conditioner at this point can be beneficial. To add volume, apply a little dry shampoo at your roots and massage it with your fingers. We'd avoid spraying all the way down, though, as it'll make your hair more challenging to manoeuver later. Instead, you can spray the braid at the end and fluff it out.
After that, you'll want to tie your hair into a ponytail, then add another hair tie roughly an inch down from the first. Create a gap between the two bands, then pull your ponytail through the hole. Next, pull the lower band down by another inch and repeat, pulling the ponytail through the second hole. Tighten as you go and repeat until you reach the bottom. You can then fluff out the hair or use the dry shampoo to add volume.
Tip: Do a side braid
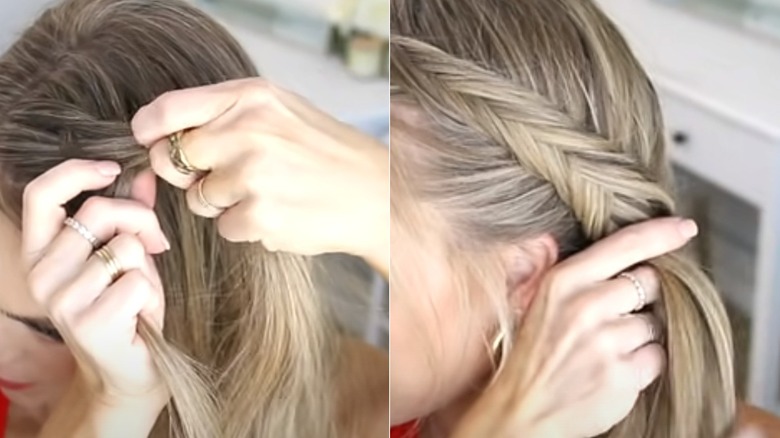
One of the issues with the fishtail braid in general, especially when trying to do it on your own hair, is not being able to see what you're doing. An easy remedy for this is a side braid. It's chic but with the added advantage of a clear view. This means propping up your mirror in front of you. Then, the steps are pretty similar to a regular braid.
Split the hair in two again over one shoulder. It may be worth loosely putting the strands into two hair ties or clips to keep them separate, but it must be loose enough to pull them out. Then you can braid as before.
We think this works best if you have longer hair, as you can see what you're doing. If you have shorter hair, one of the other methods might be more appropriate. That said, if you've followed along with us so far, you'll remember that we suggested having a handheld mirror. This can help when you can't quite see what's happening. Even just using a phone with a front-view camera might do the trick.
Tip: No-braid version
While the side braid makes the process easier, it still requires a good deal of dexterity. Using bands is much faster, but it doesn't quite have the same intricate finish. However, this method, which also requires a band (preferably clear or the same color as your hair) and two hair clips, can provide a middle ground that doesn't need as much technique and is relatively quick to achieve after some practice.
Begin by dividing your hair into several horizontal sections, using clips to keep them separate. Take the highest section and the one below it and tie them separately with hair ties. Take the top ponytail, divide it in two, lift the lower ponytail through the divide you made, and clip it at the top of your head, leaving the two upper strands hanging loose at either side.
Release the hair clip just below it, gather all the hair together, including the two strands, and tie them into a ponytail. Now, release the upper ponytail you previously clipped. Divide it in two, pull the lower ponytail through it, and clip it up again. Draw the group into a band and repeat until you reach the end of your hair. Feel free to fan out the sections as you go to add a bit of volume.
Tip: Use the pencil hack
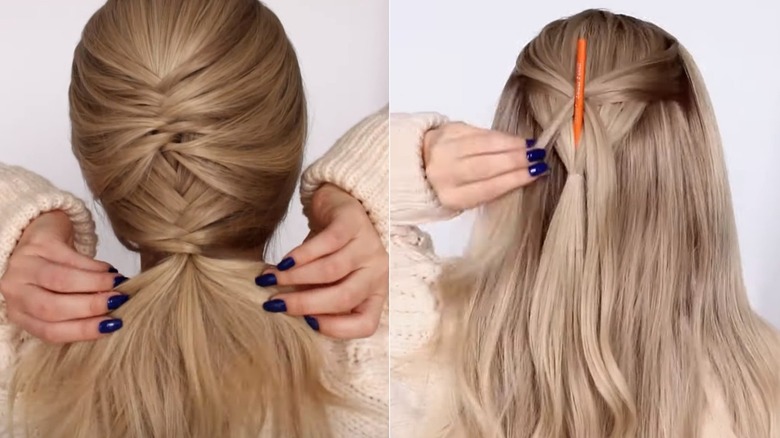
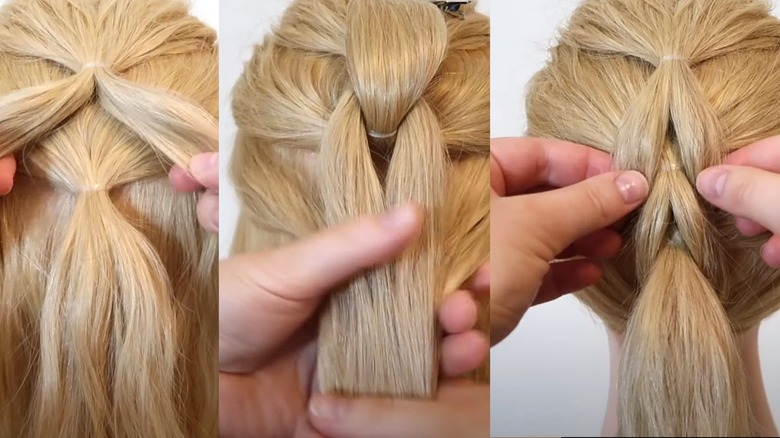
This may be the most creative hack on our list, courtesy of YouTuber Another Braid. It's time for that pencil we mentioned to make an appearance. You'll also want a couple of clear or neutral-colored hair ties. First, tie a small ponytail at the top of your head. Then, place a pencil about half an inch above the hair tie. Take a small section of hair from the left side and cross it over the pencil to the right. Repeat the process on the other side and then again two more times.
After that, grab the right and left strands you have crossed over with one hand and pull the ponytail up through the middle of them with your other hand. Release the strands and clip the ponytail on top of your head. You should have two loose strands hanging at either side of the clipped pony, which you can use to make another ponytail.
Release the top ponytail and tie both together. Insert your pencil about half an inch down again and repeat the process, crossing over four strands from each side or all the remaining hair. Pull the pony up through these strands and clip them in place. Tie the strands below, then release the above ponytail.
Tip: Try the reverse fishtail braid
The reverse fishtail braid is similar to the original but more straightforward and faster. There's a bit of a learning curve, though, when you first try this one. However, it should be much smoother once you get the method down. This one also works best as a side ponytail so you can see what you are doing, and the instructions will assume this, too.
Pull your hair into a side ponytail over your shoulder. Begin by dividing your hair into two sections, holding a section with either hand. Your palms should be facing your chest. With your index fingers, create a part at the outer edge, stick your thumbs in on top of your index fingers, lift your wrist, and switch them inwards, palm heading out. Use your thumb to open the strand you grabbed with your index finger and switch the right and left strands over using your thumbs. Re-grip the two sides and repeat: "Stick in, flip out, and switch," YouTuber Bebexo advises. Unlike the traditional approach, this method allows you to grab hair from both sides simultaneously, cutting the braiding time in half.
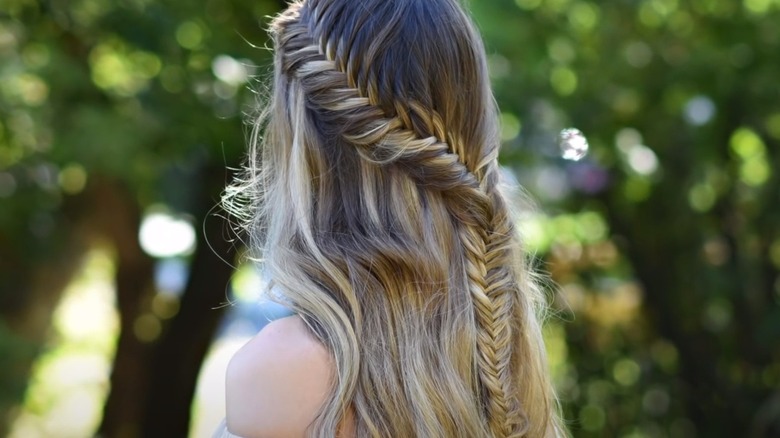
Leveling up your fishtail braid: Half-up, half-down fishtail braid
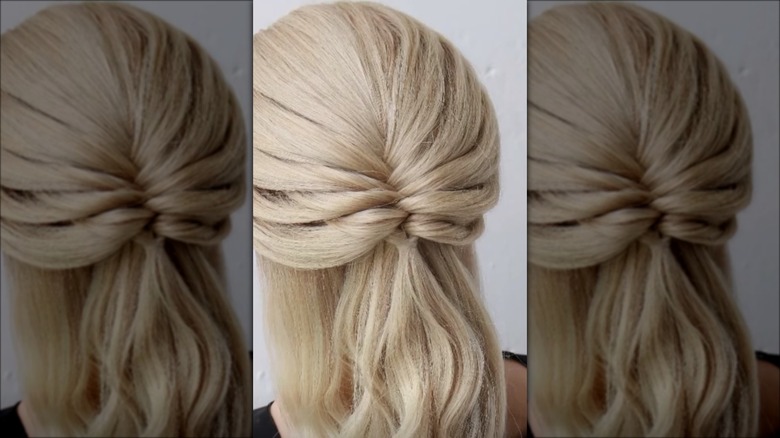
So far, we have covered a few different methods to make the fishtail braid more achievable in terms of time or complexity. However, once you've mastered the basics and got your method down, you might want to shake things up a bit. The fishtail and other similar braids are having a major moment in the fashion world, and the good news is they all have many variations to make them accessible to everyone.
One of the simplest is the half-up, half-down style. It's basically where you start the braid up high and leave the bottom loose. To do this, you'll need two hair ties. Then, use one of them to make a small ponytail at the top of your head. Add the second hair tie about halfway down this ponytail. Make a hole between the two bands and loop the bottom half of the ponytail through the middle of the ties. Gather a strand of loose hair from the left side and pull it through the hole you made, then another from the right over it. Repeat the same process, alternating between the left and right strands three more times. Pull the lower band tight to finish the braid, and it should all come together neatly.
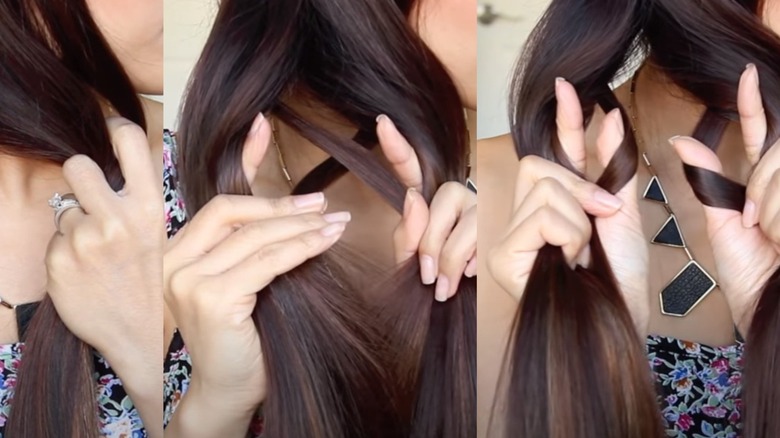
Double Dutch fishtail braid
This braid is essentially a pigtail version of a fishtail braid. You'll want to section your hair into two parts accordingly. Tie up one side with a hair tie or clip to keep it out of the way, and you can start working on one side, following the same method on the other. It's slightly more challenging than the original, though, as you'll be working with smaller hair strands. So, you'll need to have the fishtail braid down, or you can experiment with the tips we've mentioned.
The basic steps begin with taking a small section of hair from the front of your head (from whichever side you start with first) and splitting this in half, creating a right and left side. Then cross one strand over the other and take another small strand out beside the right or left, or whichever strand you started with first. Cross this strand under the other two sections and add it to the first. The best way to do this is to hold one side with your index finger and thumb and the other with your remaining three fingers so that you have a hand free to do the crossing. Then, switch hands and repeat on the other side. All you do is follow this pattern down to the end of the braid and tie it with a band. Then, move to the other side.
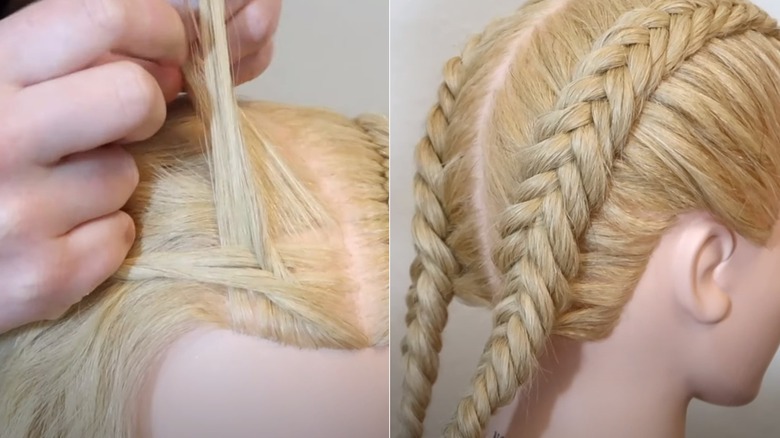
French lace fishtail braid
This technique utilizes everything we've learned so far for a sweet cottagecore look perfect for showcasing your newly acquired skills. You don't need to partition the hair with this one strictly. Go with your regular parting and start by taking a small section of hair from the front and side of your head. This will be the left and right partition as you move around your head with the braid.
From wherever you started, take a small piece of hair from the outside of the section that began from the middle, cross it over, and add it to the other section. With this style, we only want to draw new hair from the top side, and as you do so, you need to move away from the center to the back of your head.
To do the cross-over with the other section, split away a strand from the outer edge of the section you're working on and cross that over, joining the other part. Repeat this process, fluffing out the braid as you go until you reach the back of your head, close to the opposite ear from where you started. At this point, stop adding new hair, braiding down to the end of the hair, and secure it with a band.
Get the original technique down first, and move your body as you braid
The most obvious mistake when learning the fishtail braid, and we mean the original, is trying to rush through it without getting the basics down. As we've discussed, the other methods can help with speed, but if you want the traditional braid, you'll need to sit down and practice a few times. This is so you can master how to position your hands and fingers until the technique comes naturally.
However, a common mistake when braiding is not only how you position your fingers and hands but also your body. If you stand in the same spot every time, the braid will frequently end up bulky and baggy in the incorrect places when you try to join it to the rest of the style, and there will be a noticeable gap. This is especially true for variations like the French lace fishtail braid. You can achieve a smoother look by moving your hands and body in the direction of where you want the braid to sit.
Secret tip: Fishtail braids for flawless curls
This tip is another reason to do fishtail braids, aside from how they look. For those not aware, unlike ordinary leave-in overnight braids, when you set your hair with fishtail braids, the curls come out much more defined and full-bodied when you use this style.
An ordinary plait lays strands over each other, creating curves that position the hair in soft waves. The difference with the fishtail braid is that you are circling strands of hair in a pattern similar to what you might get from a roller, which is why the result is so stunning.
However, with any leave-in style, the final impact will often depend on your hair type. Pin-straight hair types may have more of a resistance against curling. And if you already have very curly hair, you may find your natural curl pattern prevails. In both cases, this means preparing the hair before braiding. After brushing the hair out, we suggest you use a light mousse or leave-in conditioner to help with the set — varying the strength depending on how resistant your hair is. Additionally, to avoid frizz, consider wrapping your hair in a silk hair wrap for the best results.